Rip's Tips - Rigging       

Other tip pages:   general comments  |  rigging  |  settling in  |  fixing stuff  |  gadgets  |  discussion

This particular tip page highlights some rigging experiences while setting up my '99 TR21...

photo Mike VanNatta, service tech Witt Marine First, an endorsement... when this guy talks about Tritons, I listen carefully. Mike VanNatta is the service tech that set up my boat at Witt Marine. This isn't the best picture in the world, but it captures Mike and my Triton in the background.

Reminder: clicking any photo links to a larger image

 Tip: Spare Prop - My '99 model TR21 owners guide doesn't show where the "long plastic bolt" in my parts bag is supposed to bolt in to hold down the spare prop. Look on the metal floor plate in the battery compartment on the back port side for the screw-hole.  

If you plan to store a spare prop, be sure your dealer does not place oil reserves, chargers, jack-plate pumps, accessories, wires, or hoses in the area. Speak up!

I cut a hole in the center of a plastic coffee can lid and positioned it under the prop hub for protection.

That's a BIG Yamaha Pro prop you see in there for my spare. It's re-hubbed for Merc and uses a special thrust washer.

fish icon back to tip list

 spare prop  

above - spare prop bolted into mount on floor plate


(Click on any photo for a larger view)


  Perko switch, dual pro and reserve oil tank locations  

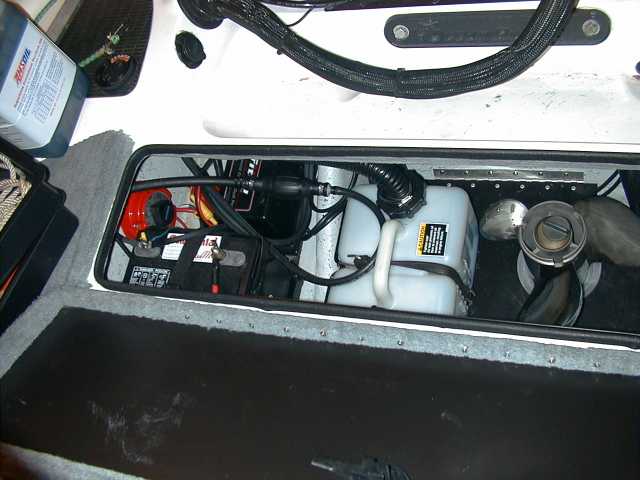
above - battery compartment rigging

 Tip: Battery Compartment - During rigging, I asked my dealer to share his and consider my suggestions for mounting options.  

We decided to place the large Mercury oil reserve on the starboard side of the metal floor plate.

We decided to tuck the Charging Systems International Dual Pro charger behind the starting battery.

This leaves room on the port side of the metal floor plate for the spare prop.

Yes, that's a gallon of Amsoil synthetic TCW-3 injector oil next to the remote oil fill.


Update - A reader mentioned that the CSI Triple Bank Pro now comes on the 2000 model TR21's. This 3-bank model is about 3 inches longer than my 2-bank Dual Pro and will not fit into the same small place on the '99 model. The more roomy 2001 TR21's can fit the battery and oil reserve together.  

I have links to brand names like CSI on my other links page.

fish icon back to tip list


  Tip: Dash Gauge Layout - During rigging, I asked my dealer to place the trim and jack plate gauges in the cut outs over the steering column to match the steering wheel mounted lever controls, moving other gauges there now like volt and fuel to new locations.  

I asked if he could move volt to the old trim location in the upper-right cut-out and fuel off dash to a side panel. His service tech, Mike VanNatta, suggested placing the Mercury motor warning gauge in the empty cut out on the switch panel.

Ain't that a big nice-lookin', well organized dash. Look how much console deck area there is on the '99 model for mounting your navigation aids and electronics... and an extra little glove box on the driver side for my hand-held GPS or cell phone!

I also let my dealer's service tech mount my Lowrance X-75 for me. Mike really knows what he's doing. Glad I resisted the I-know-better temptation and let this pro do this one and the X-48 in the bow panel.


Update... Oh yeah, a question from "Triton Mike" reminded me that my service tech suggested not moving my water pressure gauge leaving it in the upper left cutout for better driving view. It's in a lower cut-out on the '99 17 and 18 models requiring more eye movement to watch while driving. It may be repositioned in later models.  

I tried several locations for my Ritchie compass before settling on the nice flat side-console. I taped it down in several spots and noticed some interference when positioned closer to dash gauges. Try temporary locations for view and function of accessories before drilling holes.

Later model TR21's use a modular console different from mine, with more curves and less flat surfaces for you go-fast boys and girls.

fish icon back to tip list

 repositioned trim and jack plate height gauges  

above - gauges rearranged


dash and accessory area

above - looking at console and flat area for accessories


  repositioned fuel guage  

above - fuel gauge moved to side panel

 Tip: Fuel Gauge To Side Panel - During rigging, I asked my dealer and his service tech to relocate the fuel gauge to the starboard side panel in front of the control unit.  

Now I can see the gauge when filling up from the port side. I usually look at a fuel gauge when I'm starting my motor at the beginning of a day or gassing up at a pump.

The gas tank vents into the filler on the inside near the opening. Many do this now, instead of a separate external vent, to reduce moisture in the tank. Be aware on this new design, fuel may surge back and out by the time the auto-kick-off on the gasoline pump nozzle shuts flow down. I'm watching my gauge to cease or slow my fill-up before the tank is full.

It's great when your dealer cares, listens to your rigging preferences, and offers suggestions.

What was happening here? Well, my TR-21 had one available cut out (on the switch panel), but we had two new gauges to mount (Mercury warning lite and CMC jack plate height gauges). With one gauge more than cut outs, moving fuel to the side wall offered a functional and sharp looking opportunity.

The service tech, Mike VanNatta, said it was a little tricky to put a hole in the backing then neatly tuck and secure the vinyl there without tearing it, but as you can see in the picture, he did a Triton quality job.


Update... another reader mentioned placing more gauges in the dash by carefully making new cut-outs in the remaining area.  

fish icon back to tip list


  Tip: Moving Gauges in Dash - Looking at the back of the '99 model TR21 dash reveals hydraulic lines, gauges, and lotsa wires. Now I know what Mike Witt's service tech, Mike VanNatta, saw when he marked which wires went where, loosened brackets, and moved gauges around.  

I immediately noticed he did a neat job bundling and routing extra wires for the steering wheel mounted trim and jack plate levers.

The TR21 offers more behind-dash space than my last boat and better organized wire harnesses.


Update... The '99 Triton System Manual has diagrams for rotary-switch wiring and illustrations of gauge layouts but no diagrams for gauge wiring.  

Before working in this area, better tag 'em and draw your own pictures like Mike did.

Switch your battery off too (disconnect it).

fish icon back to tip list

 under TR21 dash  

above - wiring area under console


  foot throttle  

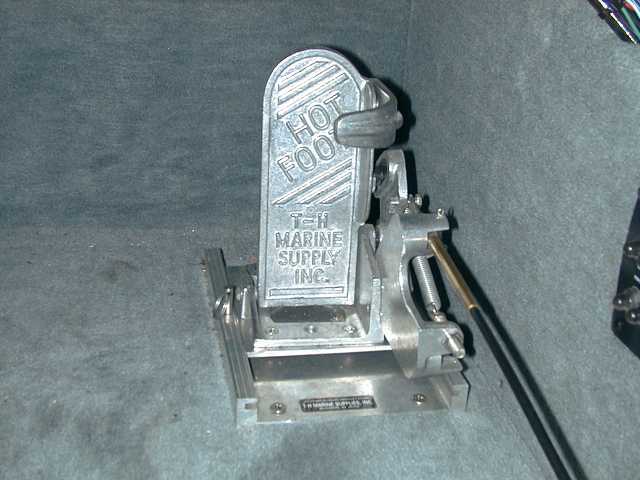
above - adjustable plate option under Hot Foot throttle

(Remember click on any photo for a larger view)

 Tip: Adjustable Foot Throttle - I decided to put an adjustable plate option on the T-H Marine Supply Inc. Hot Foot foot throttle.  

Adjusting pedal position helps different sized family members or partners drive comfortably. The T-H Marine accessory (HFM-1 adjustable Hot Foot slide mount) can be seen under the foot throttle in the picture. The pedal assembly can be moved 5" on the plate. A pin of the left side holds it secure after adjustment.

For those that get new boats every few years, adjustability can be a selling point to a buyer.

A foot throttle is a great safety feature for a high performance boat.


Update - A young couple with a fish-n-ski boat noticed the foot throttle when I launched one day. They asked if it was for racing. I explained it was for safety...  

I showed them how it returned the boat to an idle speed without foot pressure. I showed them how it freed my hands for driving. I told them how it really helped pace boat speed when driving in big waves or swells.

Since mine is adjustable, we set it so his wife could try it. She was learning to drive. They decided this was much better for their boating activities.

We discussed that it takes some "getting used to" time before docking or maneuvering in traffic or close quarters.

Take some time to share with others. Where I work, what I just did would be called a method-demonstration, showing how something works by hands-on demonstration. My Extension agency is involved in adult and youth continuing education.

fish icon back to tip list


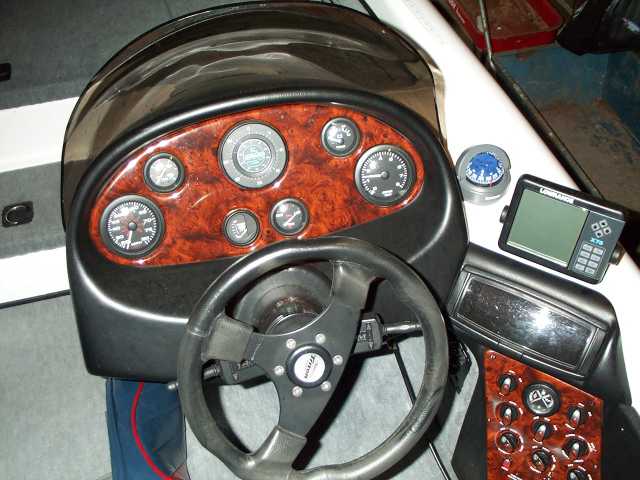
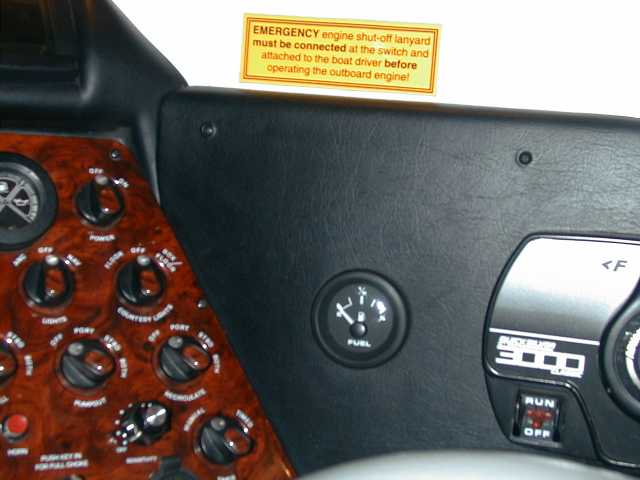
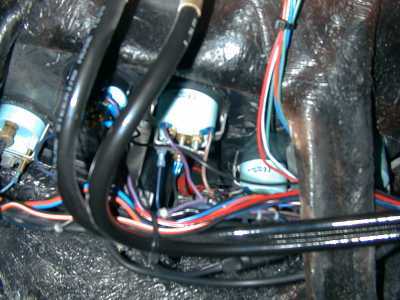
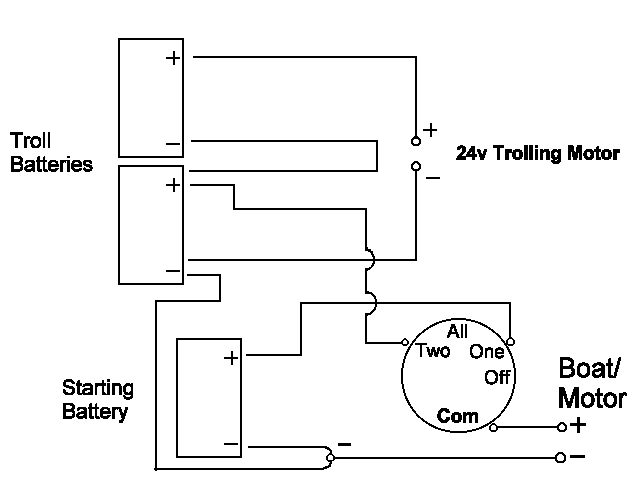
  Tip: Perko Battery Switch - Mike Witt's service tech, Mike VanNatta, suggested placing my Perko battery switch on the wall behind the starting battery. Great Location.  

Why was the Perko battery switch such an important feature to me?

  • First, the Perko switch makes it easy to power off the battery for electrical service or prevent drain by the Merc ECU between trips.
  • Second, it enables convenient switching over to a trolling battery for a jump start if electronics drain the primary. The service tech installed wiring so battery-two on the switch connects to the second of the two trolling batteries. He knew how to wire exactly what I wanted. He rigs it for their bay boats all the time.
  • Third, the Perko has a special design that retains contact with the last battery briefly while engaging the next. This smooth transition is important to your motor's electrical and charging components. Ever done like me... run your electronics and pumps all day without starting the big motor, then turned the key to zip back to weigh-in. Dull beep, uh-oh. Now, just flip switch, start off one of the troll batteries, switch back, no problem!
  • Forth, Mike's switch rigging included a common ground between my starting battery and number two troll motor battery, which is a recommendation to reduce RF interference on my bow depth finder.
  • Fifth, price and quality... look for Perko two-battery switch, 8501DP, usually priced from $20-$27. They illustrate a wiring diagram on their web page for it. See my link list page.

This common Perko product is available from Bass Pro Shops, other mail-order suppliers and most local marine dealers.

fish icon back to tip list

  Perko switch, dual pro and reserve oil tank locations  

above - battery switch on compartment wall


drawing - my perko switch wiring

above - how mine was wired...
this diagram applies only for my setup,
a 24v troll motor
running off a troll two-battery pair
with a completely separate 12v starting battery


  steering mounted trim and jack plate levers  

above - dual stem levers rigged for trim and jack plate

 Tip: Pro Trim Levers - I really like the feel of the Triton option for steering column mounted dual trim and jack plate height levers by Teleflex. The single stem lever for trim is standard. 

During rigging, I asked my Triton dealer and his service tech to put OEM gauges for trim angle and jack-plate height into left/right cut outs above the column to match lever location.

On my old boats, I've had jack-plate switches mounted on the dash or a trim switch on the shifter. I had one of those floor mounted jobs too. I like this Teleflex lever idea much better... eyes on the water.

By talking with my dealer up front, my purchase price included installation of the second switch lever which involved pulling the steering wheel and routing wires, not hard but so much quicker if you know what you are doing like Mike VanNatta.


Update... I believe these dual sets are called Teleflex ProTrim model PT2000 helm control levers or pro trim bezel switches. The "duals" are available as a Triton option or after-market priced at $54.95 in BassPro Shops catalog. The single stem is standard on the '99 model TR21PDC.  

Teleflex's main web site (http://www.teleflex.com) lists product adaptability to certain regular or tilt steering systems.

Nice compliment to the TR21's standard Teleflex's SeaStar hydraulic steering.

fish icon back to tip list


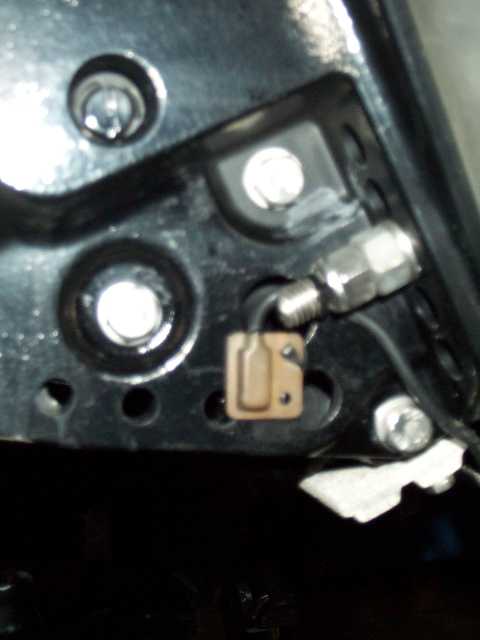
  Tip: Surface Water Temperature Sensor - My dealer's service tech, Mike VanNatta, mounted my Lowrance depth finder's surface water temperature sensor on the motor mount not into the transom.  

There were a couple larger holes near the bottom of the mount in front of the series of trim holes (see pictures right). He simply tied it there on the outside edge where the motor and jack plate would not hit it. He routed the wire similarly. He used plastic wire ties as the fasteners.

It's well below the water line at idle. This saves drilling holes in your transom. And, you can route the wire so its protected. Just insure that the motor or the jack plate will not slice it as the motor is trimmed or raised.


Update - Several readers asked about my CMC hydraulic jack plate (a link to them is on my other links page). These are about the best pictures of it that I took so far. Notice the pump and piston is now together inside the plate, not on the side like old models.  

On mine, Mike mounted the top of the boat-side base plate for the CMC about even with the top of the transom. In these pictures, the jack plate itself is raised all the way up. That's not where I normally run on the water but where I position to launch or clear stumps.

I have the height gauge option for this jack plate, and the switch is one of those turn-signal style at the steering wheel. I like it.

Now that I have Merc's water intake scoops on my '99 motor, I can jack my motor to optimum running heights. So, I marked the plate on a viewable edge at 4.50, 4.75, 5.00, 5.25, 5.50, 5.75, 6.00, etc., inch increments measured from top of transom to inside hook on motor mount (measured like the set-up guys always talk about). I'll stick a vinyl tape ruler there when I pick one up. This helps me mentally sync my gauge's plain hash marks with actual heights.

Mine's a '99 model, the year 2000 jack plate is shaped a little different, beefed up to handle 300 hp motors for you go-fast boys and girls.

fish icon back to tip list

  photo - sensor location under motor mount  

above - sensor location under motor mount


picture cmc jack plate and temp sensor location on motor mount

above - closer look at jack plate and temp sensor


surface water temperature sensor

above - close-up of sensor

(remember, click on any picture for larger view)


Return to Rip's Triton Tips main page.

Also consider exploring BBC Home Page for Bryan Bass Club information and links to other bass fishing/boating sites.


Ray's Triton Page | Buying Adventure | Area Dealers | Rip's Triton Tips | Other Links | BBC | Ripstips Home

For corrections on this page series, please contact Ray Rippstein at r-rippstein@tamu.edu

Thanks for visiting.

This intro page last updated July 3, 2006